
搜索到
344
篇与
的结果
-
 UOS 知识汇总/Linux 知识汇总 UOS创建开机自启程序或脚本通过创建桌面启动程序实现开机自启创建可执行程序或脚本启动文件xx.desktop,文件格式如下[Desktop Entry]Type=ApplicationEncoding=UTF-8Exec=/usr/bin/xx.sh #可执行程序路径Name=xx #程序名称拷贝脚本到/usr/bin目录sudo cp -f xx.sh /usr/bin/chmod a+x /usr/bin/xx.sh设置开机自启动,启动时间为开机输入密码进入桌面的瞬间执行sudo cp -f xx.desktop /etc/xdg/autostart/sudo chmod 644 /etc/xdg/autostart/xx.desktop通过配置rc-local服务实现开机自启uos默认没有开启rc-local服务,所以在创建/etc/rc.local文件,并且向该文件写入开机需要执行的命令是不会生效的,需要先开启并配置rc-local.service服务,以下为配置相关步骤:编辑/lib/systemd/system/rc-local.service文件,在文件结尾添加以下两行代码[Install] WantedBy=multi-user.target lzc@lzc-PC:~$ cat /lib/systemd/system/rc-local.service # SPDX-License-Identifier: LGPL-2.1+ # # This file is part of systemd. # # systemd is free software; you can redistribute it and/or modify it # under the terms of the GNU Lesser General Public License as published by # the Free Software Foundation; either version 2.1 of the License, or # (at your option) any later version. # This unit gets pulled automatically into multi-user.target by # systemd-rc-local-generator if /etc/rc.local is executable. [Unit] Description=/etc/rc.local Compatibility Documentation=man:systemd-rc-local-generator(8) ConditionFileIsExecutable=/etc/rc.local After=network.target [Service] Type=forking ExecStart=/etc/rc.local start TimeoutSec=0 RemainAfterExit=yes GuessMainPID=no [Install] WantedBy=multi-user.target 启动rc-local.service服务并设置开机自启systemctl start rc-local.servicesystemctl enable rc-local.service创建rc.local文件并赋予755的权限,往/etc/rc.local文件中写入开机需要执行的命令即可touch /etc/rc.localchmod 755 /etc/rc.local原文链接:https://blog.csdn.net/zZzZzZ__/article/details/120054678软连接复制在Linux中,使用cp命令复制软链接时,会根据命令行参数的不同而产生不同的结果:如果使用cp -L命令,cp会复制软链接指向的文件,而不是软链接本身。这个选项强制cp遵循软链接指向的路径,而不是复制软链接。如果使用cp -P命令,cp会复制软链接本身,而不是软链接指向的文件。这个选项使cp复制软链接,而不是软链接指向的文件。如果未使用任何选项,cp默认会复制软链接本身,而不是软链接指向的文件。这意味着在复制文件树时,软链接只是简单地被复制到目标目录中,而不会创建新的软链接或复制软链接所指向的文件。总之,如果您要复制软链接指向的文件,使用cp -L命令;如果您要复制软链接本身,请使用cp -P命令。如果您只需要将软链接复制到目标目录中,而不是复制软链接指向的文件,那么默认的cp行为就可以满足您的需求。删除打开的文件比如删除打开的.Makefile_back.swp会产生一个临时文件 .nfs000000007c3595c8000129a0再删除临时文件会提示rm: cannot remove ‘.nfs000000007c3595c8000129a0’: Device or resource busy/usr/sbin/lsof D .nfs000000007c3595c8000129a0lsof: status error on D: No such file or directoryCOMMAND PID USER FD TYPE DEVICE SIZE/OFF NODE NAMEgvim 98377 bennyhe 12u REG 0,46 12288 2083886536 .nfs000000007c3595c8000129a0查询储打开工具的PID, kill -9 98377 强制关闭关工具就可以了。删除当前路径所以空文件夹find ./ -type d -empty -deletefind ./ -type d -empty 查找所有空文件夹根据进程搜索PID同样地,你可以执行命令 ps 附带额外选项来获取某个指定的进程的 PID。例如,你可以使用以下命令来获得 firefox 的 PID。ps -el | grep -i firefox还有 ps -ef | grep gvim | grep bennyhe通过进程ID查询端口占用以上一步骤的sshd进程为例,进程PID为522(如果没有netstat命令,使用 sudo apt-get install net-tools 进行安装)netstat -nap | grep 522运行项目并下载源码1如果是查看root用户进程需要加sudo 指令应该为 :sudo netstat -nap|grep 522————————————————版权声明:本文为CSDN博主「玩转智能机器人」的原创文章,遵循CC 4.0 BY-SA版权协议,转载请附上原文出处链接及本声明。原文链接:https://blog.csdn.net/u011198687/article/details/120825794
 -
VSCode配置PyQt5 Designer 开发环境 1 vscode 安装 python扩展包配置Python解释器安装pyqt integration扩展配置pyqt integration2.1 进入配置界面如图所示进入设置, 选择Extension Settings然后在里面根据自己安装的pyqt5-tools, 把Designer设计器路径填上去。Ubuntu 系统一般在venv的lib下面。lib/python3.8/site-packages/qt5_applications/Qt/bin/designer最后可以在资源管理器的空白处右键就可以选择pyqt form了。设计之后的python选择,点击右键,选择Run current File in interactive Windows。
-
Verilog-AMS 知识汇总 verilog-AMS数据类型 --- wrealWREAL 是Verilog-AMS支持的一种新的数值模型。WREAL的特殊之处在于它使用有限的浮点数值的点来模拟一条电路工作曲线。而SPICE和Verilog-A的计算结果是一条理论上可以无限精度,包含无限点的的曲线。从某种程度上,WREAL的实现方式类似于Fast-Spice的查表点工作模式,其目的是进一步简化仿真,从而支持更大规模的模拟系统仿真。 使用WREAL的最大好处是速度快。使用WREAL变量的模型在计算的时候无需使用SPICE迭代运算。它使用的是比较简单的,直接推导的函数来模仿模拟电路真正的工作情况。 相比SPICE和Verilog-A的模型必须使用SPICE仿真器的迭代运算,WREAL仿真器使用离散事件触发,就像数字仿真器那样。这给WREAL的计算上带来极大的速度优势。但同时,离散的计算模式使得WREA模型在含有反馈的电路中无法给出准确的结果。在普通电路中它也需要牺牲输出的精度。所以,WREAL并不适用于需要精确度量的模拟电路的模型中。 WREAL的一个问题是,它需要对真正的模拟电路的行为有一个非常好的预测。因为,WREAL的所有计算都是前向的,我们想要用这些前向计算来模拟SPICE仿真器迭代结算的结果,就需要对实际电路工作情况有个很好的了解。然而,模型通常在设计阶段的前期实现,而此时通常不会有很好的对真实电路的预测。如果WREAL模型无法很好的体现SPICE仿真器对真实电路的仿真结果,那模型的意义就不大了。亦或需要在设计后期随着真实电路的开发修改模型,这样就会牺牲一些研发的时间。 有一些相关的研究正在进行中,比如利用简单的电路生成WREAL模型,这样可以作为未来新项目系统的起始WREAL模型。也有一些研究包括迭代WREAL和真实电路仿真,这样可以自动修改WREAL模型等等。但不管怎么,对于WREAL在大规模需要精度的验证中的使用,还是需要一定考虑。 一、端口(Port) Port(端口),也被称为引脚或端子,被用来连接模块到其他模块。因此,端口就是电线。简单连接的端口声明是连接声明,其中关键字wire被以下方向说明符之一替换:input、output或inout。例如: module inv (out, in); output out; input in;assign out = ~in;endmodulemodule mux (out, in0, in1, sel); output [7:0] out; input [7:0] in0, in1; input sel;assign out = sel ? in1 : in0;endmodule 对于其他类型的连接,或者寄存器(寄存器只能作为输出声明),声明的前面简单地加上方向说明符: module counter (out, clk); output reg [3:0] out;initial out = 0;always @(posedge ckl) out = out + 1;endmodule 默认情况下,多位端口的内容被解释为无符号数(值被解释为正二进制数)。可以明确指定数字是被解释为有符号数还是无符号数,如下所示: input unsigned [3:0] gain;input signed [6:0] offset;在这种情况下,增益是无符号的,而偏移量是有符号的,这意味着它被解释为有符号的双补数。因此,如果增益= 4'bF,则其值解释为15,如果offset = 7'b7FF,则其值解释为-1。 If it is necessary to apply a discipline to a port, the port declaration should be repeated with direction specifier replaced by the discipline. For example: module buffer (out, in); output out; input in; electrical out, in;analog V(out) <+ V(in);endmodule Verilog还支持连续信号总线和wreal(必须声明为总线而不是数组): module mux (out, in, sel); output out; input [1:0] in; input sel; electrical out; electrical [1:0] in;analog begin @(sel); V(out) <+ transition(sel === 0, 0, 100n)*V(in[0]); V(out) <+ transition(sel === 1, 0, 100n)*V(in[1]);endendmodulemodule mux (out, in, sel); output wreal out; input wreal [1:0] in; input sel;assign out = sel ? in[1] : in[0];endmodule Note:The Cadence simulator does not seem to follow the standard when it comes to declaring buses of wreals. With the Cadence simulator you should declare buses of wreals as arrays rather than as buses: module mux (out, in, sel); output wreal out; input wreal in[1:0]; input sel;assign out = sel ? in[1] : in[0];endmodule———————————————— 版权声明:本文为博主原创文章,遵循 CC 4.0 BY-SA 版权协议,转载请附上原文出处链接和本声明。 原文链接:https://blog.csdn.net/gsjthxy/article/details/107618649
-
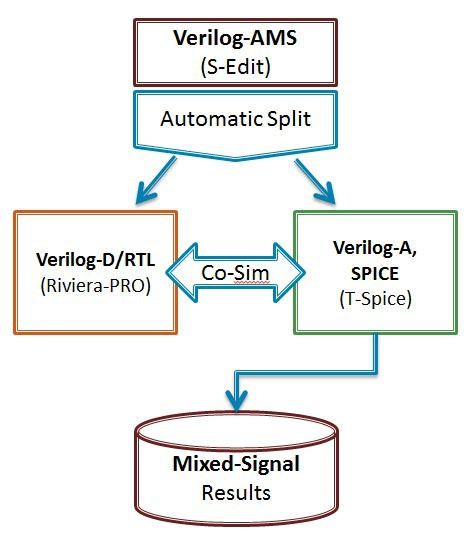
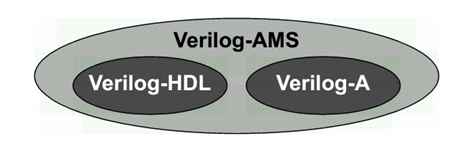
Verilog-AMS Verilog-A介绍 最近浅学了一下Verilog-AMS和Verilog-A的语法,记录一下自己理解:.Verilog-A是Verilog-AMS的子集,Verilog-A是只对analog电路进行建模的(运行基于Spice仿真器),而Verilog-AMS则可以对mixed- signal电路进行建模,包括了数字Verilog和Veirlog-A的语法 (运行基于 AMS混合信号仿真器).对于Verilog-A来说,其端口都是电器属性的,即类似于你从Spice里看到的那些模型一样;.对于Verilog-AMS来说,可以有logic类型的数字端口输入,然后electrical类型的模拟端口输出等等;.Verilog-AMS/A 可以从行为级和电路级对电路进行建模,简化了对于系统电路仿真时的复杂性;veirlog-AMS/Verilog-A中的关键概念:.分立信号转化为连续的信号 (对于数字只有0,1两种状态,但转化为连续信号,0->1过程值也会存在);.事件发生来触发信号变化(基于添加时间戳)(需解决设置的变量在事件未触发之前的初值问题);.在Verilog-A中,要时刻考虑Vth的特性,注意基于Verilog-A的model写法!.事件触发原理:在连续仿真器中,在发生事件处放置一个时间标记,从而将离散的仿真连续化;.model概念,branch概念,testbench概念(类似于verilog);一些关键代码:0. Verilog-A的阈值电压检测标准代码 (基于反相器):module inverter(out, in):output out;input in;electrical out, in;integer d_in; analog begin @(cross(V(in) - 0.5*V(vdd))) //穿越阈值电压写法(event statement),作用是在这个点建立时间戳,方便仿真器进行捕捉,否则捕捉不到这里发生的突变 ; //空白行,不在event发生时执行特定命令 d_in = V(in) > 0.5*V(vdd); //建立方波 V(out) <+ transition(!d_in, 0, 10n)*V(vdd); //用transition进行smooth处理 end endmodule.Model DAC (关键:electrical digital input -> (Vth) -> integer -> electrical analog differential output)module dac (out_p, out_n, in, clock, enable, vdda, gnda); output out_p, out_n; electrical out_p, out_n; input [7:0] in; electrical [7:0] in; input clock; electrical clock; input enable; electrical enable; input vdda; electrical vdda; input gnda; electrical gnda; integer code, en; real value;genvar i; analog begin // convert the input to a signed integer on positive clock edge @(cross(V(clock) - V(vdda)/2), +1) begin code = 0; for (i = 0; i < 8; i = i + 1) begin @(cross(V(in[i]) - V(vdda)/2)); if (V(in[i]) > V(vdda)/2) code = code + (1 << i); if (code >= 128) code = code - 256; value = code/256.0; end // reset output value when disabled @(cross(V(enable) - V(vdda)/2)) ; if (V(enable) < V(vdda)/2) value = 0; // drive the differential output V(out_p) <+ V(vdda)/2 + transition(value/2, 0, 10n); V(out_n) <+ V(vdda)/2 - transition(value/2, 0, 10n); end endmodule2. Model ADC (关键:electrical analog input -> (vth) -> integer -> electrical digital output)module adc (out, in, clk); output [5:0] out; input in, clk; electrical [5:0] out; electrical in, clk; parameter real vh = 1; parameter real vth = vh/2; parameter real tt = 100n from (0:inf); integer result; genvar i; analog begin @(cross(V(clk) - vth, +1)) begin result = 64*(V(in)+1)/2; if (result > 63) result = 63; else if (result < 0) result = 0; end for (i=0; i<6; i=i+1) V(out[i]) <+ transition(result & (1<<i) ? vh : 0, 0, tt); end endmodule3. Model Multiplexer: (关键:[3:0] sel 可以直接放入 @()中)module(out, in, sel); output out; electrical out; input [3:0] in; electrical [3:0] in; input [3:0] sel; logic [3:0] sel; analog begin @(sel) ; V(out) <+ V(in[0])*transition(sel === 0, 0, 100n); V(out) <+ V(in[1])*transition(sel === 1, 0, 100n); V(out) <+ V(in[2])*transition(sel === 2, 0, 100n); V(out) <+ V(in[3])*transition(sel === 3, 0, 100n); end endmodule4. 对于Cadence语法限制的标准处理方法:(Unfortunately, the Cadence simulator places unreasonable restrictions on event expressions in the analog block. Specifically, any digital signals used in an analog event expression must be preceded by either the posedge or negedge qualifiers. Thus, the model must be modified when intended for the Cadence simulator: )module cp (out, u, d): output out; electrical out; input u, d; logic u, d; reg sync = 0; always @(u or d) sync <= !sync; analog begin @(posedge sync or negedge sync) ; I(out) <+ 10u*(transition(d, 0, 1n) - transition(u, 0, 1n)); end endmodulean example of writing in Cadence:Cadence’s AMS simulator only supports discrete transitions filtered through posedge or negedge. Putting a discrete wire, discrete variable, or named event directly in a continuous event statement is not supported (as of 2014).real vgain;always @(gain) vgain = pow(10, (gain - 32.0)/20); real voffset;always @(offset) voffset = 1m*offset; reg break = 0;always @(vgain or voffset or en) break <= break; analog begin @(posedge break or negedge break) ; V(out) <+ transition(en ? vgain : 0, 0, 100n) * V(in) + voffset; endWith Cadence’s simulator, you can use the following for modeling multiplexers:module(out, in, sel); output out; electrical out; input [3:0] in; electrical [3:0] in; input [3:0] sel; logic [3:0] sel; reg sync = 0; always @(sel) sync <= !sync; analog begin @(posedge sync or negedge sync) ; V(out) <+ V(in[0])*transition(sel === 0, 0, 100n); V(out) <+ V(in[1])*transition(sel === 1, 0, 100n); V(out) <+ V(in[2])*transition(sel === 2, 0, 100n); V(out) <+ V(in[3])*transition(sel === 3, 0, 100n); end endmoduleTo implement a Verilog-A version of a multiplexer:module(out, in, sel); output out; electrical out; input [3:0] in; electrical [3:0] in; input [3:0] sel; logic [3:0] sel; parameter real vdd = 2.5; integer SEL; genvar i; analog begin // convert the input to an integer SEL = 0; for (i = 0; i < 2; i = i + 1) begin @(cross(V(sel[i]) - vdd/2)); if (V(sel[i]) > vdd/2) SEL = SEL + (1 << i); end V(out) <+ V(in[0])*transition(SEL == 0, 0, 100n); V(out) <+ V(in[1])*transition(SEL == 1, 0, 100n); V(out) <+ V(in[2])*transition(SEL == 2, 0, 100n); V(out) <+ V(in[3])*transition(SEL == 3, 0, 100n); end endmodule
-
vcs排除覆盖率虚高的方法 Synopsys vcs仿真器在收集覆盖率是怎么排除仿真glitch产生的覆盖率数据?在Synopsys VCS仿真器中,可以通过设置一些选项和参数来排除仿真glitch产生的覆盖率数据。以下是一些建议:使用-coverage exclude_glblck glitch选项:此选项将忽略由于glitch引起的全局时钟块的覆盖率。设置适当的仿真步长:使用较小的仿真步长可能会导致更多的glitch。尝试增加仿真步长以减少glitch的可能性。使用-vcs+lic+nowarn+assert选项:此选项会关闭所有警告,并启用所有的断言。这有助于捕获可能导致glitch的错误条件。调整覆盖率收集频率:通过调整-cm linecover或-cm togglecover等选项的频率,可以减少glitch的影响。在代码中添加额外的检查:如果可能,可以在设计代码中添加额外的检查,以确保信号稳定后再进行覆盖率收集。分析覆盖率报告:查看覆盖率报告并识别哪些区域可能存在glitch。然后,可以在这些区域中添加额外的测试用例,以更好地覆盖这些情况。请注意,这些方法可能无法完全消除由glitch引起的覆盖率数据问题,但它们可以帮助减少此类问题的发生。在Synopsys VCS仿真器中,排除由于glitch(瞬时信号跳变)产生的覆盖率数据可以通过使用特定的编译和仿真选项来实现。以下是一些方法,这些方法基于上述文档中的信息:1.使用-cm_glitch选项:这个选项可以用来过滤掉由于glitch导致的额外夏盖率数据。例如,设置-cm_glitch 0可以过滤掉在0时刻由于glitchi产生的夏盖率数据。2.利用$cm_coverage系统函数:在Verilog:或SystemVerilog代码中,可以通过$cm_coverage系统函数动态地查询或修改夏盖率选项。这个函数可以用来在运行时使能或关闭特定的夏盖率类型,从而避免收集由于gtch产生的夏盖率数据3。3.设置-covg_cont_on_error选项:当仿真运行到非法功能夏盖率bin时,使用这个选项可以让仿真继续运行,而不是停止。这样可以避免由于错误或异常情况导致的覆盖率数据被错误地收集。通过上述方法,用户可以有效地排除由于gtc产生的夏盖率数据,确保覆盖率结果的准确性和可靠性。这些选项和函数提供了灵活性,使得覆盖率收集可以专注于用户感兴趣的特定仿真行为和事件,同时避免由于仿真过程中的瞬时信号跳变而引入的噪声。Synopsys vcs仿真器在收集覆盖率是怎么排除仿真0时刻的覆盖率数据在Synopsys VCS仿真器中,可以通过以下方法来排除仿真0时刻的覆盖率数据:使用-cm_init选项:此选项允许您指定一个时间点(以模拟周期为单位),从该时间点开始收集覆盖率数据。例如,如果您希望从第一个时钟边沿开始收集覆盖率数据,可以使用以下命令:-cm_init=1这将忽略仿真开始时的0时刻覆盖率数据。使用条件覆盖率:您可以使用条件覆盖率(CCOV)选项来控制何时开始收集覆盖率数据。通过在设计代码中添加相应的条件语句,可以在满足特定条件后开始收集覆盖率数据。例如:initial begin @(posedge clk); if (reset == 1'b0) begin $set_coverage_control("start"); end end在代码中添加额外的检查:如果可能,可以在设计代码中添加额外的检查,以确保信号稳定后再进行覆盖率收集。这可以帮助避免在仿真开始时收集不准确的覆盖率数据。请注意,这些方法可能无法完全消除由仿真0时刻引起的覆盖率数据问题,但它们可以帮助减少此类问题的发生。当然,以下是更多关于如何在Synopsys VCS仿真器中排除仿真0时刻的覆盖率数据的方法:使用延迟初始化(Deferred Initialization):通过使用VCS的延迟初始化功能,可以在仿真开始时避免某些模块或信号被初始化。这可以帮助确保在收集覆盖率数据之前,所有必要的信号和模块都已经稳定。分析覆盖率报告:查看覆盖率报告并识别哪些区域可能存在由于仿真0时刻导致的问题。然后,可以针对这些区域编写额外的测试用例,以更好地覆盖这些情况。使用-cm_control选项:此选项允许您控制何时开始和停止收集覆盖率数据。您可以根据需要创建多个覆盖组,并为每个组设置不同的起始和结束时间点。例如:-cm_control "start_group1:2; end_group1:3" -cm_control "start_group2:5; end_group2:7"调整仿真步长:尝试增加仿真步长以减少由仿真0时刻引起的不准确的覆盖率数据。验证设计代码:检查您的设计代码,确保在仿真开始时没有触发任何不应发生的事件或状态变化。这可能包括复位、中断或其他可能导致覆盖率数据问题的条件。请记住,这些方法可能会有所帮助,但可能无法完全消除由仿真0时刻引起的覆盖率数据问题。在实际应用中,您可能需要结合多种方法来优化覆盖率数据的质量。在Synopsys VCS仿真器中,排除仿真0时刻的夏盖率数据可以通过设置特定的编译和仿真选项来实现。以下是一些方法和选项,这些方法基于上述文档中的信息:1.使用编译选项-cmhier来指定要收集覆盖率的模块、实例和子层次结构,以及要排除的源文件。例如,如果你想排除某个模块及其子模块的夏盖率,可以在-cm_hier配置文件中使用+tree instance_name[level_number]来指定只编译和收集夏盖率的实例和子实例,而忽略其他实例1。2.利用仿真选项-cm来控制覆盖率的收集。例如,如果你想排除0时刻的某些wys块的夏盖率,可以通过设置-cm选项来指定不收集特定类型的覆盖率,如tg1(翻转覆盖率)或1ine(代码行覆盖本)3.使用系统函数$cm_coverage()在仿真过程中动态地开启或关闭覆盖率的收集。通过在仿真脚本中设置条件,可以在0时刻之后开启夏盖率收集,从而排除0时刻的覆盖率数据1。4.在仿真脚本中设置条件,以确保在0时刻不执行某些测试用例或测试序列,这样可以避免在0时刻收集到不希望的夏盖率数据。5.使用urg命令行工具来合并覆盖率数据时,可以通过-dbname选项指定要合并的覆盖率数据库文件,而不包括0时刻的数据。此外,可以使用-orep0rt选项来阻止生成包含0时刻数据的夏盖率报告。通过上述方法,用户可以根据需要排除仿真0时刻的夏盖率数据,以便更准确地分析和评估仿真结果。这些方法提供了灵活性,使得覆盖率收集可以专注于用户感兴趣的特定仿真行为和事件。